Animator
Thus far, I’ve been bumbling through animations. I haven’t really understood how they work. So, to deal with spawning, I wanted to get a little more tricky with it and try to truly figure out how certain parts of it operate. I think I have a better idea now, though definitely still bumbling through.
Sampling
All my initial animations were using 60 samples. As a result, I would time the keyframes based on that: 60 frames is one second, so if i want Mega Man to blink every 3 seconds, I would place the blinking keyframe at frame number 180 (or, in the dopesheet, 3:00). It made sense and translated to wall clock time. That said, I still had no idea what samples did or how it worked. Now I do (I think).
The number of samples is basically how many frames per second of the animation are done. For example, if you have only 3 frames in the animation, and your number of samples is 3, each frame will be visible for a third of a second. If you up the samples to 6, now each frame is visible for a sixth of a second. Basically, you can control the speed of the animation with number of samples to some degree.
I had some animations that were just a single sprite because I needed to use them as state in the animator. However, the samples were 60. This meant that every second, the animation was updating 60 times even though it was the same sprite. Yikes. Adjusting that to 1 is much more efficient.
Curves/Position
These sprites change size. For example, when Mega Man shoots, his arm extends, so the sprite width gets a few pixels wider. Things like that aren’t very noticeable, but the default is to align the sprite’s middle point with the position of the object’s transform. So, if Mega Man had a sprite that had a larger height, he would extend into Rush’s sprite rather than just grow upwards. Similarly, if there was a sprite where he’s shorter, he would slightly float when transitioning to that sprite if the position was based off his standing sprite.
To resolve this, I have been adjusting sprite sizes by adding empty space.
I knew there was a position property available in the animator, but I never really figured out how to use it. Perhaps this is not the best use of it anyway, but once you add a transform position property to the animation, you can begin to tinker with the Curves tab. It allows you to adjust the position of each sample. So, if there’s a unique keyframe each sample, then you can move it in any direction you live.
Also, since we’re working with sprites, making the tangents (transitions between curve points) constant avoided the smooth movement… though it’s interesting that I can move things smoothly if I desire.
In order to figure out how much to move the sprite, I needed to understand positioning units and how that translates to pixels.
Unit Sizing
Again, I’ve been kind of bumbling around with units and sizing things, never really understanding how it translates to pixels on the screen. So, in order to the spawn animation where I had to tinker with curves, I had to know exactly what position to move to. All my sprites are 50 pixels per unit. I set them all to that in order to double their size, but I didn’t really understand why it did it.
Positioning in Unity is all by “units”; the grid on the scene window is as well. So, if a sprite is 50 pixels tall and 50 pixels wide, and you’re using 50 pixels per unit (PPU), it takes up 1 square unit. If you change PPU to 100, now it takes up only a quarter of a square unit (0.5 x 0.5 units). Since positioning is by unit, if I want to move my sprite 5 pixels, I need to convert the 5 pixels to units before adjusting.
So, for example, the spawn sprites go from a height of 66 pixels to 42, to 24, back to 66, then 50 (standing Mega Man). Since my final position is 50, I’ll size based off that:
- 66 is +16 pixels, but since it’s centered, we half that to +8. Since we’re at 50 PPU, that would be 0.16 units.
- 42 would be -0.08 units.
- 24 would be -0.26 units.
In Retrospect
While learning about curves and unit sizing is great, I discovered sprites can have a pivot set in the sprite editor to eliminate the need to adjust position in the animation’s curves (at least in my use case). I’ll try to adjust to use that later.
Spawning
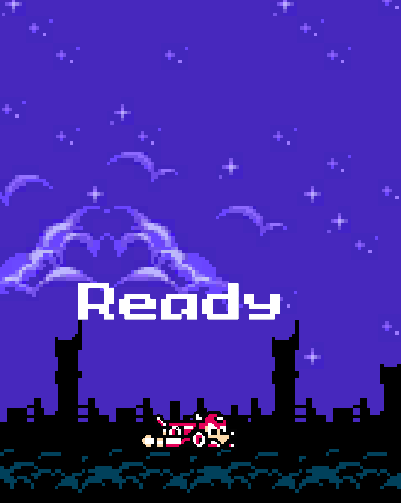
I’m getting ready to implement lives in the game, so I need a proper spawn. So far, the stage just immediately begins, but when you die and respawn, I don’t want it to just begin immediately. There should be a wind-up. So, I added a “Ready” screen: additional TMP object, blinking script, done. Since I already had some logic to blink on the title screen, I refactored that into a utility class and re-used it.
Next up was spawning. I did the whole spawn animation thing above, but the more challenging part was the drop. I figured spawning (and “Ready”) are part of a stage, so I added the logic to the stage. Once I passed in Mega Man’s animator, it was a matter of manipulating his position and triggering the spawn animation. After the spawn animation, he’s ready to go.
Initially I tried doing this in the stage’s Update, but that went quite poorly for a variety of reasons. It worked in the end, but felt clunky due to an _isSpawning flag, and the fact that we have to continually check that flag each frame. I accidentally left that code in when I committed, too. Instead, I just made it a coroutine that runs once the “Ready” coroutine is completed.
The process is:
- Position him above the camera.
- Disable all player input.
- Flash “Ready”.
- Quickly move his position down to his final resting point.
- Trigger spawn animation.
I still don’t really like the solution though. Positioning him above the camera and disabling his animator seems weird to me. But it works, so I am going with it for now.
Up Next
Two things:
- Lives and respawn after dying if there are lives left (and a Game Over if not).
- Play with sprite pivots a bit to simplify some of what I did above.

Leave a comment